
Brake rotors aren't a recent innovation—the technology gained popularity in motorsports during the early 1950s, featured on models like the Le Mans-winning Jaguar C-Type, and later made its way into more mainstream vehicles such asthe innovative Citroen DSA few years later. Even though many decades have passed, the basic design of brake rotors has remained largely unchanged. However, high-performance vehicles often feature advanced carbon-ceramic rotors paired with ceramic pads, as this combination offers enhanced braking performance.
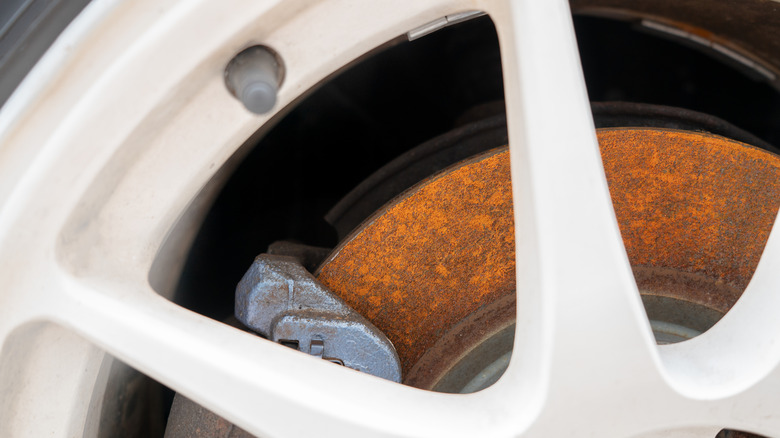
However, for those of us who don't have the luxury of driving a high-performance supercar every morning, it's likely that our vehicles rely on standard cast-iron brake rotors to handle stopping power behind those alloy wheels. Cast iron works well for brake rotors because it's durable, cost-effective to manufacture, and has a decent lifespan. One drawback, however, is that cast iron rotors can sometimes look rather unattractive due to their tendency to rust easily.
This is especially the case for vehicles that are driven infrequently, whereas cars used more often tend to avoid surface rust on the rotor face because regular braking helps keep the surface clean. Additionally, brake dust from the pads can stick to parts of the rotor and is often difficult to remove, making the rotor look even worse. However, all is not lost—cleaning your brake rotors at home is a straightforward DIY job that every driver should be able to handle. You’ll only need some soapy water, brake cleaner, a rag or cloth, and a wire brush for tougher spots.
Read more: Every Leading Car Insurance Provider Ranked from Least to Most Favorable (Based on Consumer Reports)
Cleaning your brake rotors at home has never been simpler.

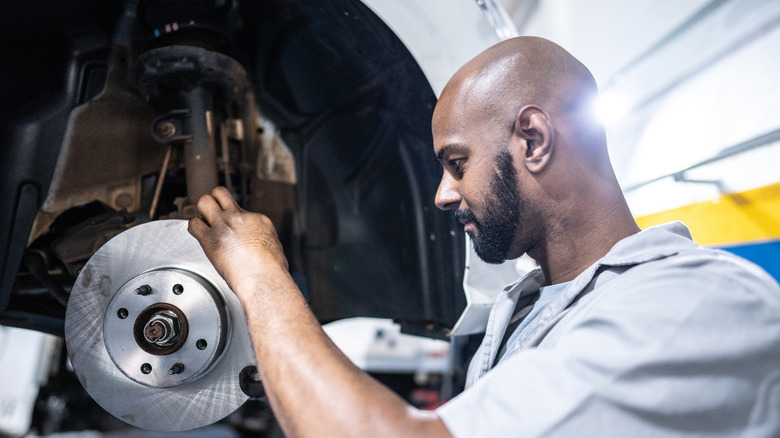
While you can clean your brake rotors at home without taking off the wheel, caliper, or rotor itself, removing these components gives you improved access and leads to a more effective cleaning. If you have basic automotive tools available, it's recommended to lift the car using a jack, stabilize it with an axle stand, and then take off the wheel. This will give you the ability to reach and remove both the caliper and the brake rotor. If you're not certain how to proceed, there are plenty of resources available to guide you through the process.Helpful brake removal and replacement guidesavailable online to guide you through the process.
With the brake rotor taken off, you can start the cleaning process. Begin by using warm soapy water, just like you would when washing dishes. As you clean, scrub the surface with a sponge to help remove most of the rust and brake dust buildup. Afterward, dry the rotor with a towel and inspect your work. If there are still tough stains left, try soaking the rotor in brake cleaner, followed by scrubbing the affected areas with a wire brush. This stronger method should help eliminate those persistent marks.
Keeping Brake Rotors Clean for the Long Haul
Cleaning your brake rotors is just as simple asChanging your oil at home can be a cost-effective and rewarding way to maintain your vehicle. Here's a brief overview of the process: 1. **Gather Supplies**: You'll need the correct type and amount of motor oil for your car, a new oil filter, a wrench or socket set to remove the drain plug, an oil filter wrench, a funnel, and an oil catch pan to collect the old oil. 2. **Prepare Your Vehicle**: Make sure the engine is warm but not hot—run it for a few minutes if it's cold. Park on a level surface and engage the parking brake. If necessary, raise the vehicle using jack stands or ramps for better access. 3. **Drain the Old Oil**: Locate the oil drain plug underneath the engine. Place the oil catch pan beneath it, then carefully remove the plug and allow the oil to drain completely. While the oil is draining, remove the old oil filter. Some oil may spill, so be prepared. 4. **Install the New Filter**: Before installing the new filter, apply a small amount of fresh oil to the rubber gasket to ensure a proper seal. Screw the new filter on by hand—don’t overtighten. 5. **Replace the Drain Plug**: Once the oil has fully drained, reinstall the drain plug securely, but avoid over-tightening as this can damage the threads. 6. **Add New Oil**: Using a funnel, pour in the new motor oil. Check your owner’s manual to confirm the correct oil capacity for your engine. 7. **Check for Leaks and Oil Level**: Start the engine and let it run for a minute or two. Turn it off and wait a few minutes, then check under the car for leaks. Use the dipstick to verify the oil level and add more if needed. 8. **Dispose of Used Oil Properly**: Never throw used oil in the trash or pour it down the drain. Take it to a recycling center or auto parts store that accepts used motor oil. By following these steps, you can safely and effectively change your oil at home and keep your engine running smoothly., if not simpler, but maintaining their cleanliness is a different challenge. No matter how well you polish them, cast-iron brake rotors will keep rusting when exposed to weather conditions, and brake dust will keep accumulating on the rotor as you drive. Unfortunately, there isn't much you can do to keep your rotors looking spotless, though there is one method you can use to slow down their deterioration.
Fortunately, the solution for maintaining brake rotors in good condition is simple—just drive your car. When you apply the brakes, the pads naturally remove surface corrosion and brake dust from the rotor's face. It's during periods when the vehicle sits idle that corrosion starts to accumulate and brake dust becomes embedded in the rotor surface, making it harder to remove. By driving regularly, you can prevent the buildup of these unsightly deposits on your rotors.
Looking for the newest updates in technology and automotive trends?Sign up for our complimentary newsletterGet the newest headlines, expert guides, and practical tips delivered straight to your inbox—one email at a time.
Read the original article on Tech Bytes Lab.

No comments:
Post a Comment